
 Create A New PO
- Login to COS
- Select "Project" Click "New Project"
- Choose "Client" Enter "Project Name"
- Choose "MMS" as the Project Template Click "Create New PO"
- More information can be found in this article: New Project Page
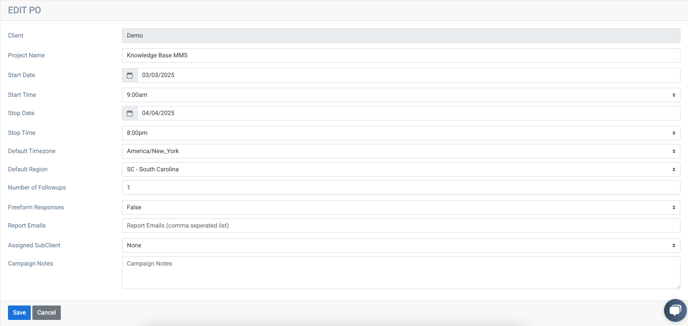 General Info
- Select the "Start Date"
- Select the "Start Time"
- Select the "Stop Date"
- Select the "Stop Time"
- Select the "State"
- Enter the "Number of Followups"
- Assign a "SubClient" (If Applicable)
- Enter any "Campaign Notes"
- Click "Save"
- More information can be found on this page: Edit Po: General Info
 Upload The Data
- Click "Campaign Data"
- Choose "Upload Campaign Data"
- Drag/drop or select the data file that will be uploaded
- Click "Upload"
- Choose "List Processing" type
- Make sure that the Phone, Name and ID fields have the correct column selected
- Click "Save and Next"
- More information can be found on this page: Upload Campaign Data
 Entering The Script
- Click Messages" Copy/Paste or type the script into the opening (Include "opt-out" language in initial message)
- Click "Save and Next"
- If responses are needed go to next follow up Click "Add Response"
- Type in response
- Repeat if more responses are needed Add any other responses
- Click "Save and Review"
 Entering Multimedia
- Click "MMS Files"
- Click Upload File Drag and drop the multimedia file into the opening
- Click "Upload" Go to “Messages”
- Click the (+) Next to Addition Param
- Select the file of the media uploaded
- Click the check box.
- Scrub The Data Select Campaign Database"
- Click "List Scrub"
- Choose "Mark Cells as Wireless"
- Click "Run Action"
- Choose "Mark Litigator Numbers as Status DNC"
- Click "Run Action"
- Choose "Delete Landline Numbers"
- Click "Run Action"
- More information can be found on this page: MMS Files
 SMS Info
- Click "Edit PO"
- Choose "SMS Info"
- Select the "SMS Message Service Group"
- Click "Save" Return to "Messages" Tab
- Click "Test SMS"
- Enter Telephone number in which to test to. "Click Send"
- Review test message before moving forward.'