
The Smart Patch Program enables prerecorded constituent messages to be systematically directed to designated representative phone lines.
Smart Patch Program Setup Guide
 Step 1: Configure Custom Caller ID
- Access the Campaign Operating System (COS) dashboard
- Navigate to the Management submenu from the project dashboard
- Select "Phone Setup"
- Either:
- - Utilize an existing phone group with the desired Caller ID (CID), or
- - Create a new phone group
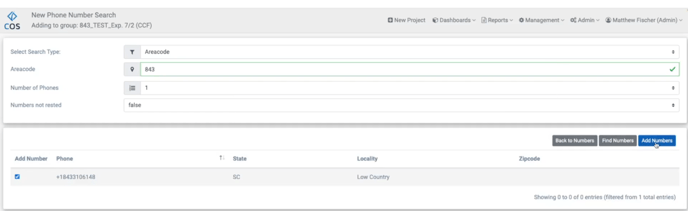
See this article for further information on phone groups and creation: Phone Setup - Add a new CID to the selected phone group by:
- - Searching for CID by type
- - Entering the desired area code in the appropriate field
- - Selecting "Find Numbers"
- - Once numbers populate, select "Add" to complete the process
 Step 2: Build Patch Program
- Create a new standard patch program
For more information on building a Patch Program, see this article: Setting Up a Patch Project - Within the data configuration, replace the target phone number (Repnumber) with the custom CID created in Step 1
- Important: Use only one number for this configuration
 Step 3: Build Robo IVR Project
- Create a Robo IVR project using the same data file as the patch program
For more information on setting up a Robo IVR project, see this article: IVR Robo Quick Start - Configure as inbound-only to capture recordings (no outbound messages/calls)
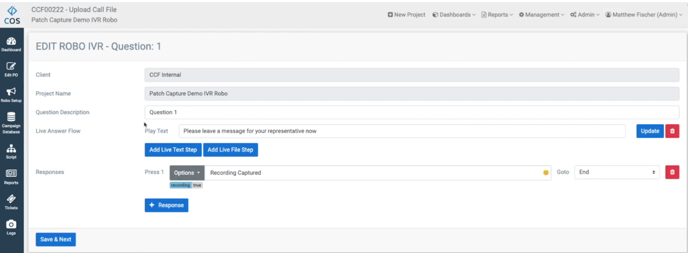
- In the script builder:
- - Select "Add Live Text Step"
- - Enter: "Please leave a message for your representative now"
- - Select "Add"
- No live file step is required
- Enter one response labeled "Recording Captured"
- In response options, enable "Set Recording as True"
- Select "Save & Next" to proceed
 Step 4: Map Inbound Calls
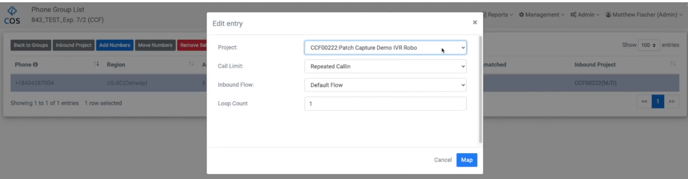
- Open the CID created in Step 1
- Select the phone number
- Choose "Inbound Project"
- In the project section, select the Robo IVR project from Step 3
- Configure call settings:
- - Call Limit: "Repeated Callin"
- - Inbound Flow: "Default"
- - Loop Count: 1
- Select "Map" to finalize
 Step 5: Access and Manage Recordings
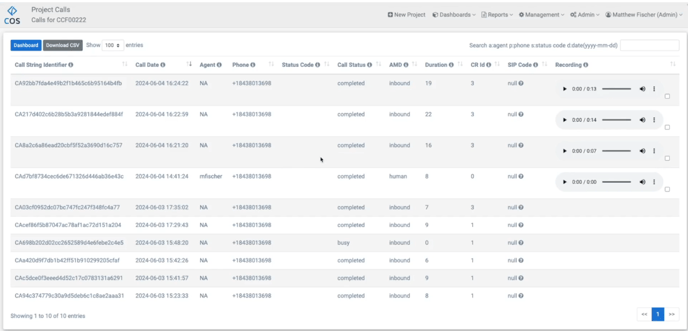
- Select "Logs" within the Robo IVR project
- Select "Calls"
- From this interface, recordings can be sorted and reviewed
- To download recordings:
- - Select the checkbox adjacent to the media player
- Select recordings.
- - Select "Download .CSV"
- Recordings will be displayed as a 2 in the recordings column within the data.
 Step 6: Create Voter ID Project
- Setup Voter ID program
For more information on building a Voter ID project, see this article: COS Quick Start Guide (Voter ID) - Prepare a data file with:
- - Target name in the first column
- - Created CID from Step 1 in a second phone number column
- - Recording URL from the Robo IVR project in the final column
- When uploading the data file, set list processing to "Non-Household List AS-IS" to preserve duplicate numbers
- In the script builder:
- - Configure one question and one response
- - Body text may remain blank
- - Label the response "Delivered Message"
- In response options:
- - Select "Play File Hangup" to deliver the recording and disconnect
- - Alternatively, select "Play File" for an agent to remain on the line
- Insert the header containing the recording URL from your data file